
How to Lace Shoes: 7 Easy Styles for Comfort, Fit & Style
⚡ Quick Summary: How to Lace Shoes
The best lacing method depends on the fit problem you are trying to solve. Start with standard criss-cross lacing for everyday shoes, then change the pattern if you have heel slipping, top-of-foot pressure or a tight forefoot.
- 👟 Everyday fit: Use standard Criss-Cross lacing.
- 🏃 Heel slipping: Try a Heel Lock or Runner’s Loop.
- 🦶 Top-of-foot pressure: Try Window or Parallel Lacing.
- ↔️ Wide forefoot: Reduce crossing tension around the widest area.
- ✨ Clean sneaker look: Try Straight Bar Lacing.
- 🥾 Boots: Ladder Lacing can create a structured look and fit.
- 🔗 Laces keep coming undone: Check your knot and lace material.
🤖 Want a Quick AI Summary?
Ask an AI assistant to summarize this guide or compare the lacing method with your specific shoe, foot shape or fit problem.
If your shoes feel loose at the heel, tight across the top of your foot, or cramped around the toes, changing the lacing pattern can sometimes improve the fit without changing the shoe.
The standard criss-cross pattern works well for everyday use, but it is not the only option. A heel lock can help with heel movement, while a straight or parallel pattern can reduce pressure across the top of the foot. People with a wider forefoot can also use lacing adjustments to create more room where they need it.
ASICS recommends standard criss-cross lacing for most runners, with alternative patterns for specific fit problems such as heel slipping, pressure on the top of the foot and different foot shapes.
Quick Answer: What Is the Best Way to Lace Shoes?
For most everyday shoes, start with standard criss-cross lacing and adjust the tension so the shoe feels secure without squeezing your foot.
Choose a different method when you have a specific problem:
| Your problem | Lacing style to try |
| Normal everyday fit | Standard Criss-Cross |
| Heel slipping | Heel Lock / Runner’s Loop |
| Pressure on top of foot | Straight / Parallel Lacing |
| Wide forefoot | Wide-Foot Lacing |
| Cramped toes | Diagonal or modified lacing |
| Clean sneaker appearance | Straight Bar Lacing |
| Decorative sneaker style | Loop-Back or Ladder Lacing |
There is no single lacing pattern that works for every foot. The best choice depends on the shoe, your foot shape and where you feel pressure or movement.
Why Your Lacing Pattern Matters
Shoelaces do more than keep a shoe closed. They help adjust how the upper holds your foot.
A shoe can feel different depending on how much tension you put through each section of the eyelets. This is particularly noticeable if you have a narrow heel, wider forefoot, high instep or a shoe that feels slightly loose.
ASICS specifically provides different lacing techniques for problems such as heel slipping, toe discomfort, wide feet and pressure across the top of the foot.
Adidas also notes that different lacing patterns can be chosen for either functional purposes or appearance. Its guide includes straight, ladder, spider-web, bow-tie, loop-back and hidden-lace styles.
So instead of asking, “What is the coolest way to lace shoes?”, start with:
What problem am I trying to solve?
7 Ways to Lace Shoes
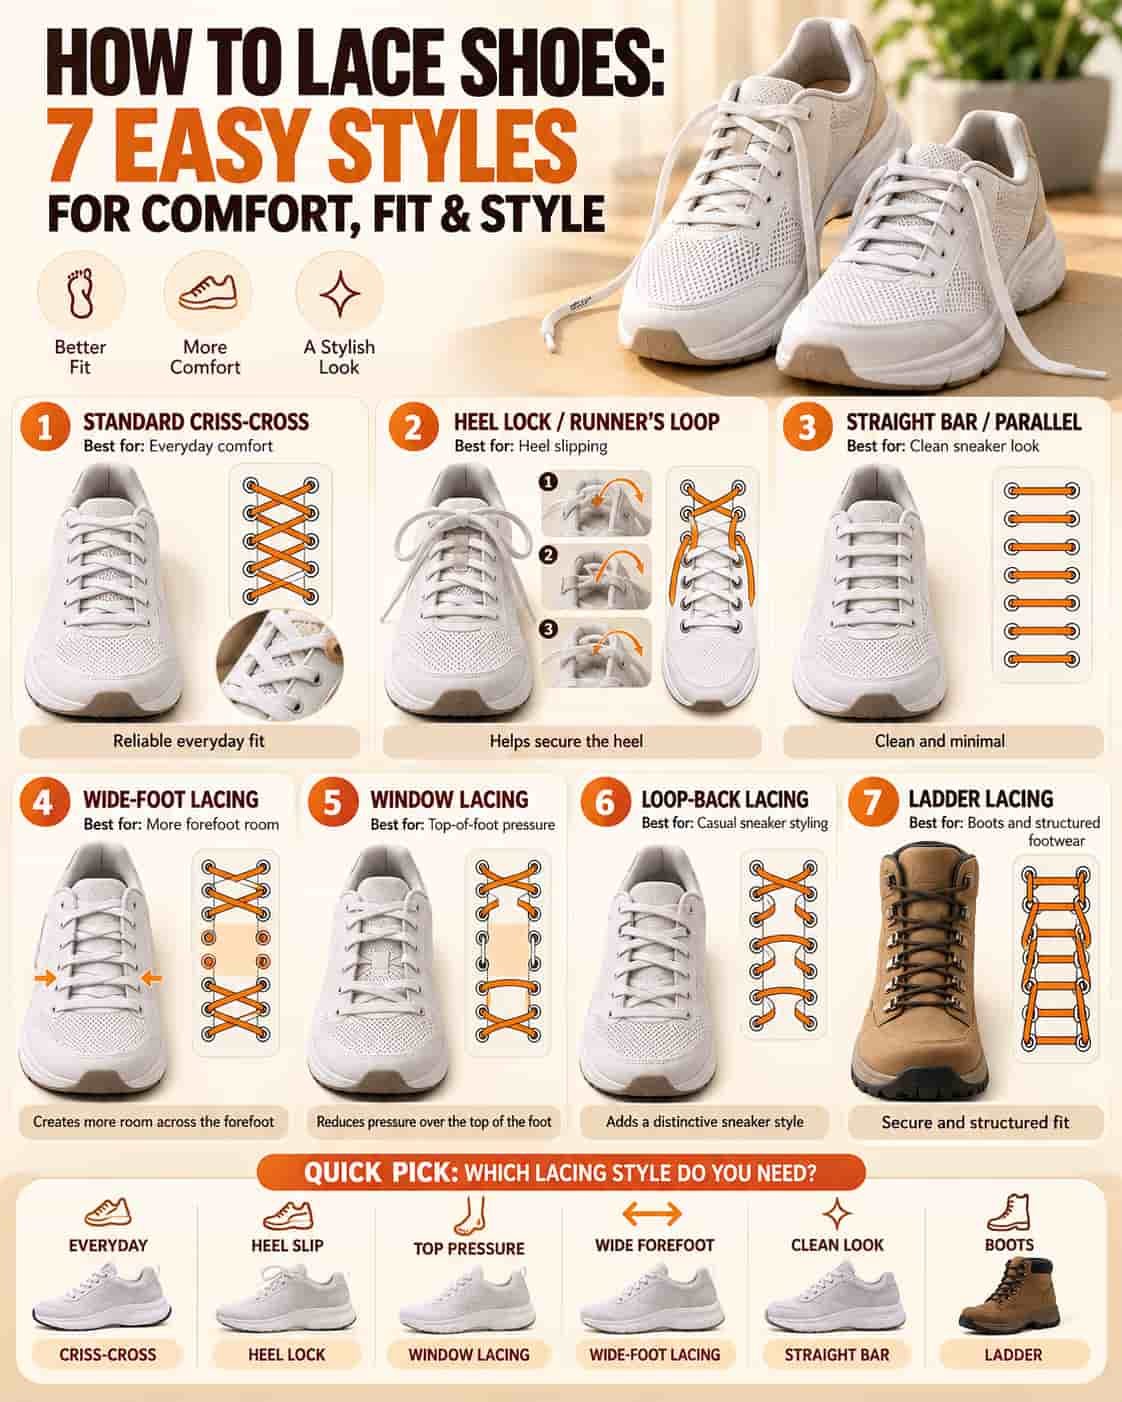
1. Standard Criss-Cross Lacing
Best for: Everyday shoes, walking, gym use and most sneakers.
This is the familiar lacing pattern found on many sneakers and running shoes. Each lace crosses diagonally from one side to the other as you move toward the top eyelets.
How to do standard criss-cross lacing
- Start at the bottom pair of eyelets.
- Make both lace ends approximately equal in length.
- Take one lace across the tongue and through the next eyelet on the opposite side.
- Repeat with the other lace.
- Continue alternating sides until you reach the top.
- Tie the shoe using a secure bow.
For most people, this is a good starting point because it provides a straightforward way to distribute tension across the shoe. ASICS describes the standard criss-cross pattern as the conventional option for most runners.
Try this first if: Your shoes already feel comfortable and you simply need a secure everyday fit.
2. Heel Lock or Runner’s Loop
Best for: Heel slipping, running, hiking and reducing excessive heel movement.
If your heel lifts inside the shoe while you walk or run, the extra eyelet near the top of many athletic shoes can be useful.
ASICS recommends a heel-lock technique for heel slipping. The method creates a small loop near the top of the shoe, then the opposite lace is passed through that loop before tying.
How to do a heel lock
- Lace the shoe normally using criss-cross lacing.
- Stop when you reach the second-to-last eyelet.
- Instead of crossing the laces, put each lace through the final eyelet on the same side.
- Leave a small loop between the final two eyelets.
- Cross each lace through the loop on the opposite side.
- Pull the laces snugly.
- Tie your normal bow.
The goal is to secure the heel without needing to overtighten the entire shoe.
Does a heel lock really help?
It can help when heel movement is the problem. ASICS states that heel-lock lacing can reduce heel movement and the friction associated with heel slippage.
Real-world experiences are more mixed. Some Reddit runners report that the technique substantially reduces heel movement, while others find that it creates pressure around the ankle or top of the foot.
Important: If a heel lock causes pain or pressure, loosen it or return to another lacing pattern. A lacing technique should improve the fit, not create a new pressure point.
3. Straight Bar or Parallel Lacing
Best for: Dress shoes, casual sneakers and pressure across the top of the foot.
Straight lacing creates horizontal bars across the shoe instead of the visible diagonal crosses used in standard criss-cross lacing.
It is especially popular when appearance matters, but it can also be useful when you want a different pressure distribution over the tongue.
ASICS describes parallel or straight lacing as an option for runners who feel that their shoes are too tight across the top of the foot.
How to do straight bar lacing
- Start with the bottom pair of eyelets.
- Thread the lace horizontally across the bottom.
- Bring one end vertically up through the next available eyelet.
- Run it horizontally across to the opposite side.
- Repeat the process while alternating the eyelets.
- Adjust the tension evenly before tying.
Adidas also includes straight lacing as a clean sneaker-lacing style and notes that it creates a different visual appearance from standard criss-cross lacing.
4. Wide-Foot Lacing
Best for: Wider forefeet, pressure around the ball of the foot and shoes that feel tight in the forefoot.
If your shoe fits your heel but feels restrictive around the forefoot, changing the lacing pattern may create additional room.
One approach is to reduce or remove the crossing tension over the area that feels tight.
How to try wide-foot lacing
- Start with the bottom eyelets.
- Keep the bottom section secure.
- Instead of crossing the laces over the widest part of your foot, run them more vertically on each side.
- Continue the modified pattern toward the top.
- Adjust the tension around the heel separately.
ASICS provides a specific wide-foot lacing method that changes how the laces cross through the eyelets.
Reddit discussions also show people using modified lacing to create more room around the forefoot or reduce pressure over sensitive areas.
Keep in mind: Lacing can change the feel of a shoe, but it cannot turn a fundamentally narrow shoe into a genuinely wide shoe. If your toes are compressed even with the laces loosened, consider a wider shoe or larger toe box.
5. Window Lacing for Pressure on the Top of the Foot
Best for: A painful or sensitive spot across the instep.
This is sometimes called gap lacing or window lacing.
The idea is simple: instead of crossing the laces over the area that feels uncomfortable, you create a small open section.
How to do window lacing
- Identify the eyelets directly around the pressure point.
- Unlace the shoe down to that area.
- Instead of crossing the laces, run them vertically on each side.
- Continue normal criss-cross lacing above the sensitive area.
- Adjust the tension so the shoe remains secure.
This type of modification is commonly discussed by runners who experience pressure over the top of the foot. Recent Reddit discussions include users reporting that skipping a crossing section helped reduce pressure in sensitive areas.
When should you stop?
If the top of your foot continues to hurt, your toes become numb, or you need to leave the shoe extremely loose to tolerate it, the problem may be the shoe’s fit rather than the lacing.
6. Loop-Back Lacing
Best for: Casual sneakers and a distinctive appearance.
Loop-back lacing creates a decorative pattern where the laces loop around each other through the middle of the shoe.
Adidas includes loop-back lacing among its creative sneaker-lacing methods.
How to do loop-back lacing
- Start at the bottom eyelets.
- Keep both lace ends even.
- Cross the laces diagonally.
- Loop the two lace ends around each other.
- Feed them through the next available eyelets.
- Repeat the pattern toward the top.
- Tie the laces normally.
This style is mainly about appearance and customization. If your priority is running performance or solving heel movement, use a functional pattern such as the heel lock instead.
7. Ladder Lacing
Best for: Boots, high-eyelet shoes and a distinctive structured appearance.
Ladder lacing creates horizontal sections connected by vertical sections along the sides.
Adidas describes ladder lacing as a style particularly suited to shoes with several eyelets, including boots and sneakers.
How to do ladder lacing
- Start at the bottom eyelets.
- Run the laces horizontally across the first pair.
- Bring each end vertically up to the next eyelet.
- Cross each lace across the shoe.
- Loop it around the vertical section.
- Continue upward.
- Tie the laces at the top.
Because this pattern can feel different from standard criss-cross lacing, check the fit carefully before using it for long walks or athletic activity.
Which Shoe Lacing Style Should You Use?
Here’s the simple version:
| Lacing style | Best for | Main benefit | Difficulty |
| Criss-Cross | Everyday use | Balanced, familiar fit | Easy |
| Heel Lock | Heel slipping | Holds heel more securely | Easy |
| Straight Bar | Casual & dress shoes | Clean look and different pressure distribution | Medium |
| Wide-Foot | Wider forefoot | Creates more room in selected areas | Medium |
| Window Lacing | Top-of-foot pressure | Removes a crossing over a sensitive area | Easy |
| Loop-Back | Fashion sneakers | Decorative appearance | Medium |
| Ladder | Boots & high-eyelet shoes | Structured look | Medium |
How Tight Should Shoelaces Be?
Your shoes should feel secure without creating pressure points.
You should not need to pull the laces as tight as possible to keep your foot from moving.
Check three areas:
Heel
Your heel should remain reasonably secure without repeatedly lifting out of the shoe.
Midfoot
The laces should hold your foot without creating painful pressure across the instep.
Toes
Your toes should have enough room to move naturally. If loosening the laces still does not give your toes enough space, consider changing the shoe rather than continuing to loosen the laces.
Adidas similarly recommends choosing lacing tension based on the activity and desired fit rather than using one fixed tightness for every situation.
How to Lace Shoes for Running
For running, start with standard criss-cross lacing.
If your heel moves inside the shoe, try the heel lock / runner’s loop.
If you feel pressure over the top of your foot, try a parallel or window-lacing modification instead.
ASICS specifically provides different lacing methods for heel slipping, toe discomfort, wide feet and pressure across the foot.
A useful rule is:
Solve the specific fit problem instead of automatically tightening every lace.
How to Lace Shoes for Wide Feet
If the shoe feels tight around your forefoot, first check whether the shoe itself is wide enough.
If the shoe is otherwise a good fit, try reducing the crossing tension over the widest part of your foot.
You can:
- Skip a crossing over the pressure point.
- Run the laces vertically through selected eyelets.
- Leave slightly more room around the forefoot.
- Keep the upper eyelets snug enough to secure the heel.
ASICS provides a wide-foot lacing method specifically designed to change how the laces distribute tension across the shoe.
How to Lace Shoes When Your Heel Slips
If your heel lifts while walking or running, try the extra top eyelet.
The heel lock is designed specifically for this situation.
However, heel slipping can also indicate that the shoe’s heel cup or overall shape does not match your foot. Reddit users describe both successful and unsuccessful experiences with heel-lock lacing, which is a good reminder that the technique is not a universal fix.
If you have to tighten the laces enough to make your ankle or instep hurt, reconsider the shoe fit rather than continuing to tighten.
How to Lace Shoes When the Top of Your Foot Hurts
Try window lacing or parallel/straight lacing.
The goal is to remove or reduce the lace crossing directly over the uncomfortable area.
A recent Reddit discussion about top-of-foot pain described window lacing as one possible adjustment, while other users have discussed skipping sections of the lacing pattern to reduce pressure.
If pain, numbness or tingling continues, don’t assume the laces are the only issue.
How to Lace Shoes for a Clean Look
For sneakers, straight bar lacing is one of the simplest ways to create a cleaner appearance.
For a more decorative style, try:
- Loop-back lacing
- Ladder lacing
- Bow-tie lacing
- Spider-web lacing
Adidas demonstrates several of these styles with step-by-step instructions.
The best-looking method is ultimately a style choice, but very loose decorative lacing is not ideal when you need your shoe to hold your foot securely during activity.
How to Tie Shoelaces So They Stay Tied
The lacing pattern and the knot are two different things.
A commonly used secure option is a square or reef knot. One way to recognize it is that the finished bow lies relatively flat across the shoe rather than twisting vertically.
If your laces repeatedly come undone:
- Check whether you are creating a balanced knot.
- Try flat laces if your current laces are very slippery.
- Use a double knot for activities where accidental loosening is a concern.
- Check whether the lace material is contributing to the problem.
- Replace worn or damaged laces.
Do not rely on excessive tightening to compensate for a poor knot.
Flat vs. Round Shoelaces
The type of lace also affects how a shoe feels and looks.
Flat laces
Flat laces are common on sneakers and casual shoes. Their wider shape can provide a different feel when tightened through the eyelets.
Round laces
Round laces are common on boots and dress shoes. Thin round waxed laces are particularly common in formal footwear.
Elastic laces
Elastic laces can make shoes easier to put on and remove and can provide a flexible fit. They are particularly useful for people who want a no-tie setup.
If you are replacing your laces, measure your current pair before buying a new length rather than relying only on the number of eyelets.
Which Lacing Style Should You Try?
Choose the problem you’re having and get a quick lacing suggestion.
Shoelace Length: How Long Should Your Laces Be?
There is no single lace length for every shoe.
The required length depends on:
- Number of eyelet pairs
- Distance between the eyelets
- Shoe type
- Lacing pattern
- How much lace you want left for tying
The easiest method is to remove your existing laces and measure them from end to end.
If you change from criss-cross to a pattern that uses more or less lace, the ideal replacement length may also change.
Best Shoelaces to Consider
If your current laces are worn, too slippery or the wrong length, replacing them can be an inexpensive way to change the fit or appearance of your shoes.
For example, current shopping results include athletic oval laces, elastic no-tie laces and lock-style running laces. Availability and prices can change.
For running: A lock-style or athletic lace can be useful when you want a secure fit without repeatedly retying your shoes.
For everyday sneakers: Flat or oval replacement laces are a simple option.
For easy slip-on use: Elastic no-tie laces can reduce the need to untie and retie the shoe.
For dress shoes: Thin waxed cotton round laces are commonly used. Current examples include 60–120 cm options, so measure your existing laces before ordering.
Common Shoelacing Mistakes
1. Pulling every section too tight
Your shoe does not need maximum tension everywhere. Adjust the lacing based on where you need more or less room.
2. Using the heel lock when you don’t need it
If your heel already feels secure, there may be no reason to use the extra eyelet.
3. Ignoring a narrow toe box
Lacing can change pressure, but it cannot completely fix a shoe that is fundamentally too narrow.
4. Making the heel secure by crushing the instep
If your heel slips but the top of your foot hurts when you tighten the laces, the shoe may not match your foot shape.
5. Using the same pattern for every activity
Walking, running, hiking and casual wear can have different fit requirements.
Frequently Asked Questions
Is there one correct way to lace shoes?
No. Standard criss-cross lacing is a common starting point, but different patterns can be useful for heel slipping, pressure points, wider feet or style.
What is the best way to lace shoes for running?
Start with standard criss-cross lacing. If your heel slips, try a heel lock or runner’s loop. ASICS recommends this approach for addressing heel movement.
How do I lace shoes so my heel doesn’t slip?
Use the extra top eyelet to create a heel lock or runner’s loop. If this causes ankle or instep pressure, loosen it or try a different pattern.
How do I lace shoes for wide feet?
Try a wide-foot pattern that reduces crossing tension across the widest part of the foot. If the shoe remains tight, look for a wider size or a shoe with a roomier toe box.
How do I stop my shoelaces from coming undone?
Use a balanced square/reef knot, check the lace material and consider a double knot for activities where the laces need extra security.
What is the extra hole at the top of running shoes for?
It can be used for a heel-lock or runner’s-loop lacing pattern. The technique creates a loop that helps secure the heel.
Is straight bar lacing better than criss-cross lacing?
Not universally. Straight lacing gives a different pressure distribution and a cleaner appearance, while criss-cross is the conventional everyday pattern.
What is the Ian Knot?
The Ian Knot is a shoelace-tying technique designed to create a secure knot quickly. It is different from a shoe-lacing pattern because it describes how you tie the final knot rather than how the lace travels through the eyelets.
Should I use elastic laces?
Elastic laces can be useful if you want easier entry and exit or a flexible no-tie setup. For running or other activities, choose a setup that still gives you the level of security you need.
Can changing how I lace my shoes fix foot pain?
It may improve comfort when the problem is related to pressure or movement inside the shoe. It cannot correct every foot problem, and persistent pain should not simply be solved by tightening or changing the laces repeatedly.
Quick Fit Check Before You Walk or Run
After lacing your shoes, take a few steps and check:
Heel: Does it stay reasonably secure?
Midfoot: Does the shoe hold without painful pressure?
Toes: Can they move comfortably?
Top of foot: Is there any concentrated pressure from the laces?
Knot: Does it stay secure without requiring excessive tension?
If the shoe only feels secure when the laces are painfully tight, the issue may be the shoe’s size or shape rather than your lacing technique.
The Conclusion
The best way to lace shoes depends on what you are trying to fix.
Use criss-cross lacing for a normal everyday fit. Try a heel lock when your heel slips. Use straight or window lacing when you experience pressure across the top of your foot. For a wider forefoot, modify the crossing pattern or consider a shoe with more room.
Lacing is a useful way to fine-tune fit, but it cannot compensate for a shoe that is fundamentally the wrong size or shape.
If your current laces are worn or constantly coming undone, replacing them with the right length and material can be a simple next step.
Explore More Footwear Guides
Looking for more help with footwear fit?
- How to Stretch Tight Shoes
- Our Shoe Testing Methodology
- Best Shoes for Plantar Fasciitis
- Best Walking Shoes for Plantar Fasciitis
- Best Running Shoes for Plantar Fasciitis
- Best Wide-Width Shoes for Plantar Fasciitis