
How to Remove Ink Stains from Leather Shoes: A Safe Step-by-Step Guide
An ink mark on a favorite pair of leather shoes can look permanent, but it does not always mean the shoes are ruined. The safest way to remove ink depends on the type of leather, the type of ink, how old the stain is, and how the leather reacts during cleaning.
For most smooth, finished leather shoes, start with the least aggressive method: blot fresh ink, patch-test a compatible leather cleaner, and work on the stain gradually. If the cleaner does not work and the leather is confirmed to be compatible, a very small amount of rubbing alcohol may help with stubborn ink. Never pour solvent directly onto the shoe, and never skip the patch test.
The most important rule is simple:
Do not trade an ink mark for a damaged leather finish.
Quick Answer: How Do You Remove Ink from Leather Shoes?
To remove ink from finished leather shoes:
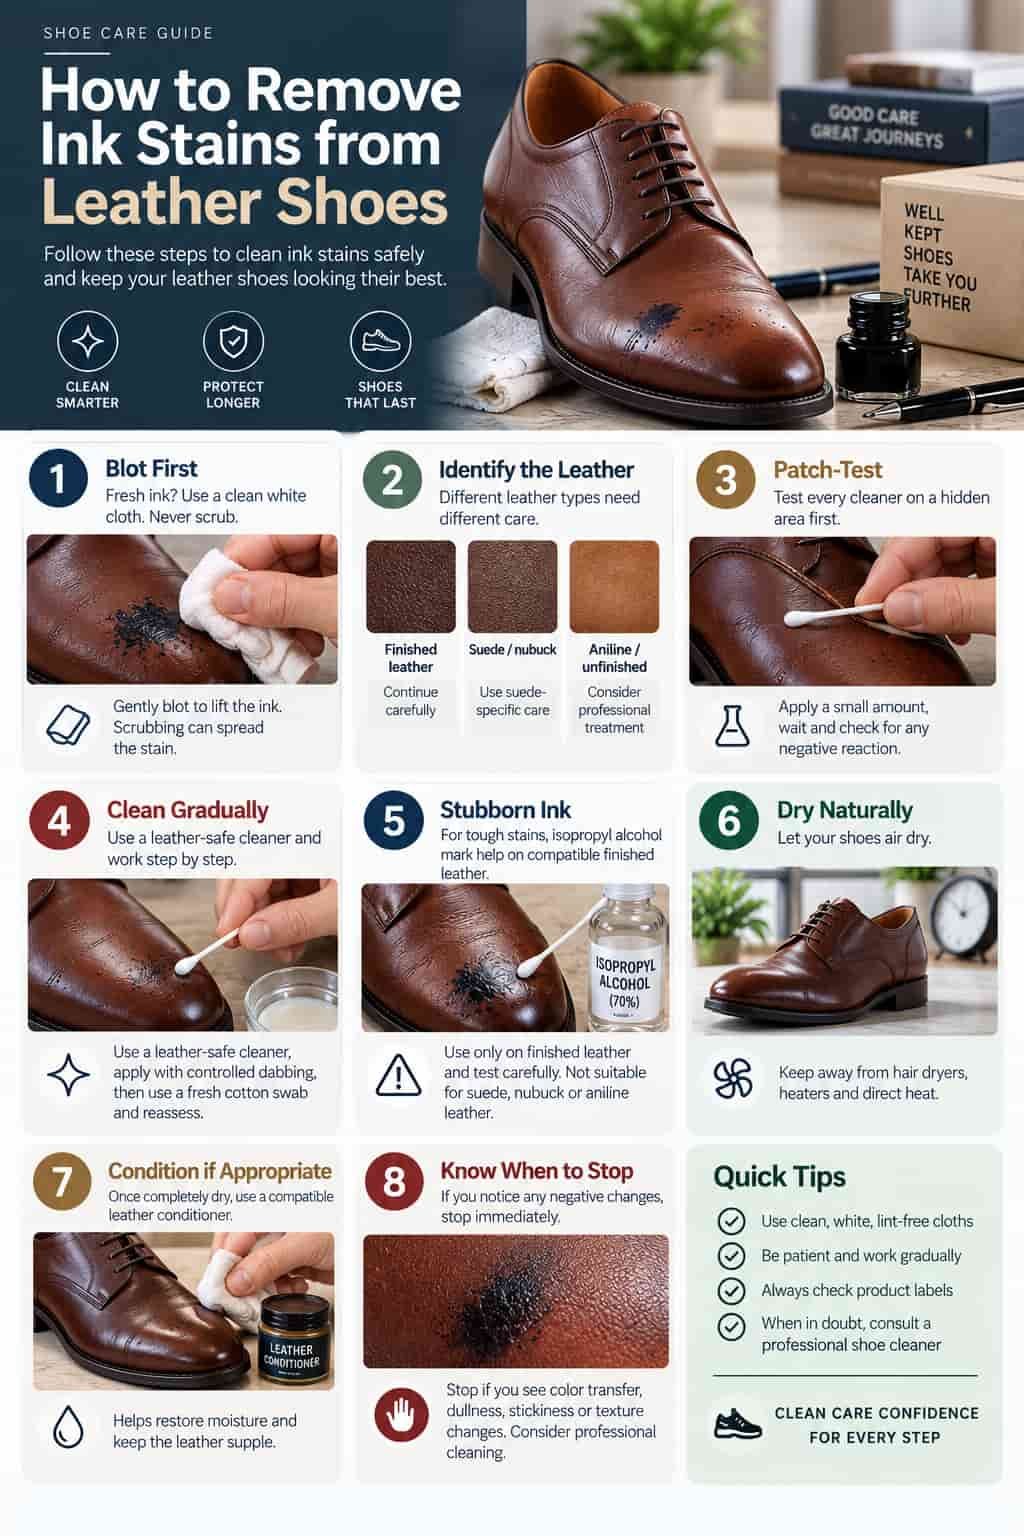
- Blot fresh ink immediately with a clean white cloth. Do not rub.
- Identify the leather and check the manufacturer’s care instructions.
- Patch-test your cleaner on a hidden area first.
- Apply a small amount of leather-safe cleaner to a cotton swab or soft white cloth.
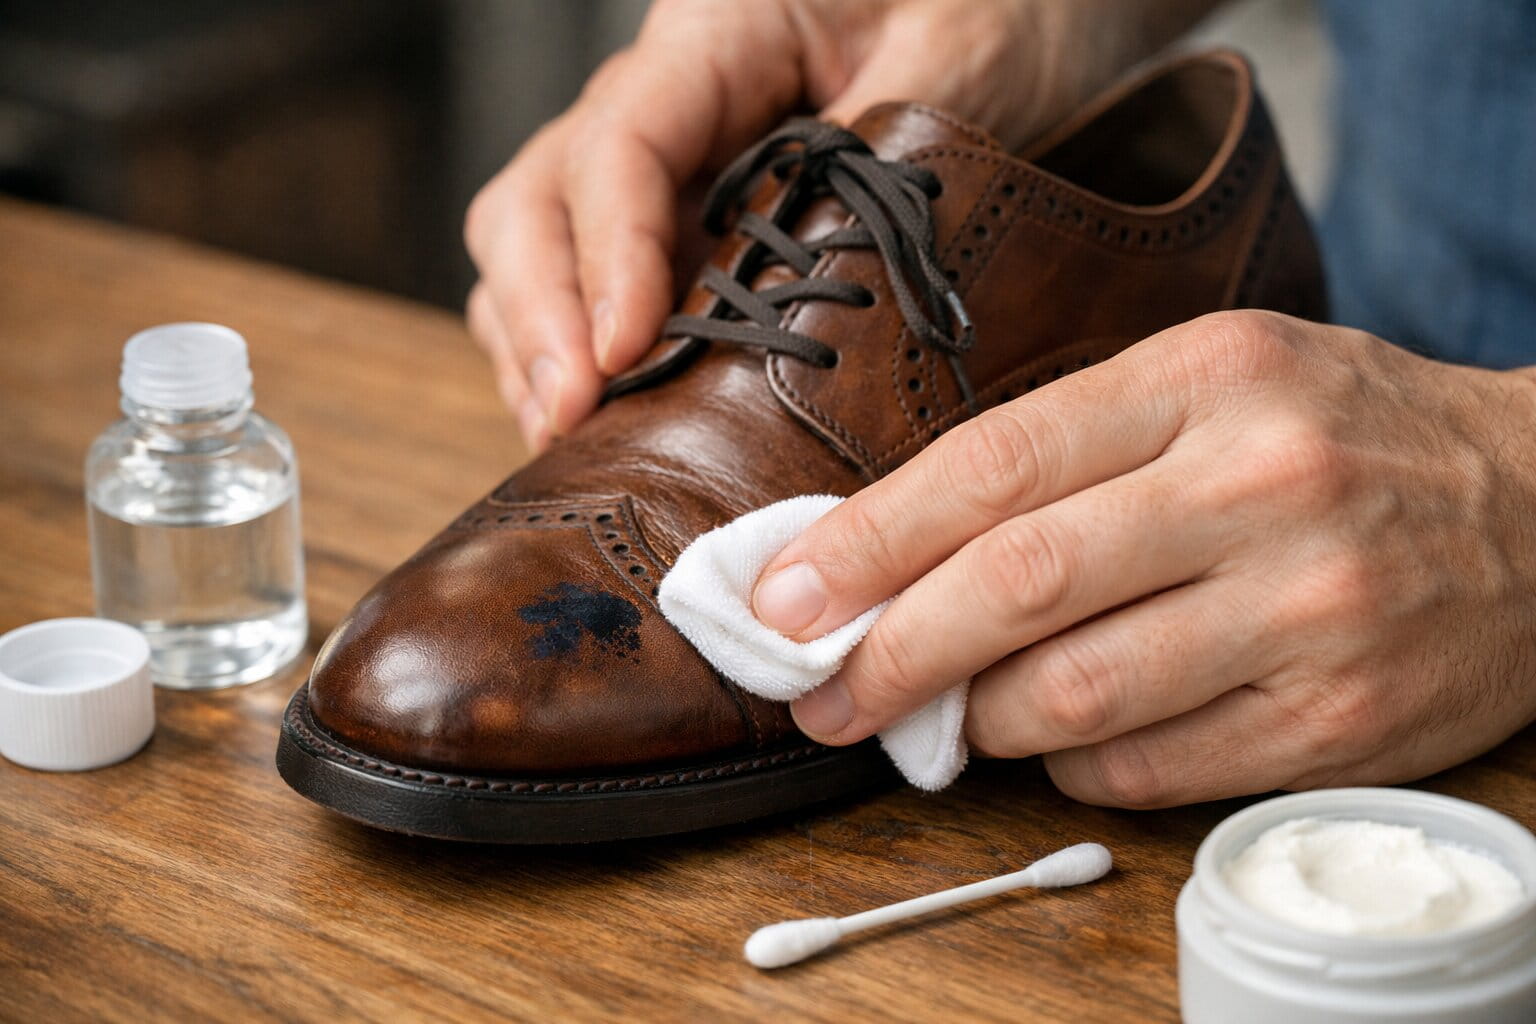
- Dab the ink gently, working in a controlled area and changing to a clean section as ink transfers.
- If the stain remains and the leather is compatible, consider a small, controlled application of isopropyl alcohol after patch testing.
- Remove residue and let the shoes air-dry naturally away from heat.
- Once completely dry, apply a compatible leather conditioner if the leather requires conditioning.
If the leather is aniline, unfinished, suede, nubuck, antique, highly valuable, or already damaged, professional cleaning is usually the safer option.
Before You Clean: Identify Your Leather
This is the step most quick cleaning hacks leave out.
Leather is not one uniform material. A smooth, coated dress shoe can react very differently from an open-pore aniline leather or a suede upper.
Finished or Pigmented Leather
Finished leather has a protective surface coating and is common on many smooth leather shoes, boots and sneakers.
It is generally the best candidate for careful at-home spot cleaning, provided the manufacturer’s care instructions allow it.
Aniline or Unfinished Leather
Aniline and other open-pore leathers absorb liquids more readily.
Ink can penetrate these surfaces deeply, and aggressive cleaning may create a larger discoloration than the original stain.
If you cannot confidently identify the finish, do not experiment with strong solvents.
Suede and Nubuck
Suede and nubuck have a textured nap rather than the smooth surface found on finished leather.
Do not automatically apply the leather-shoe method in this article to suede or nubuck. Use a material-specific cleaning process instead.
For more guidance, see our guide to how to clean suede shoes without water.
Patent Leather
Patent leather has a glossy coated finish that can be scratched, dulled or affected by unsuitable solvents.
Follow the manufacturer’s care instructions and avoid abrasive cleaners.
Synthetic Leather and PU
Synthetic leather may look like genuine leather but has different material properties.
Do not assume a cleaner that is suitable for genuine leather is automatically suitable for polyurethane or other synthetic uppers.
The 30-Second Decision Guide
Not sure what to do first?
| Your Situation | Best First Step | What to Avoid |
| Fresh ink on finished leather | Blot with a clean white cloth | Rubbing |
| Dried ink on finished leather | Patch-test a leather-safe cleaner | Scrubbing |
| Stubborn ballpoint ink | Controlled spot treatment after testing | Pouring solvent directly |
| White leather | Test carefully and watch for color loss | Bleach or aggressive abrasives |
| Suede or nubuck | Use suede-specific care | Treating it like smooth leather |
| Aniline/unfinished leather | Blot and seek specialist guidance | Household solvents |
| Large or deep stain | Professional assessment | Repeated DIY treatments |
| Leather already cracked or peeling | Professional assessment | Solvent experimentation |
The basic principle is consistent across reputable leather-care guidance: identify the material, blot rather than scrub, patch-test products and stop if the finish or color begins changing.
What You Need to Remove Ink from Leather Shoes
For a controlled spot treatment, gather:
- Clean white microfiber cloth
- Cotton swabs
- Leather-safe cleaner
- Small amount of clean water, if required by the cleaner’s instructions
- Compatible leather conditioner
- Soft shoe brush for finishing
- Isopropyl alcohol only if the leather is confirmed compatible and the patch test passes
Using white cloths and cotton swabs makes it easier to see whether the ink or the leather’s own color is transferring during treatment. Leather-care specialists also recommend applying cleaning products in controlled amounts rather than flooding the surface.
Step 1: Stop the Ink from Spreading
If the ink is still wet, act quickly.
Place a clean white cloth over the affected area and press lightly.
Do not drag the cloth across the stain.
Do not scrub.
Do not immediately add water.
Your goal is to remove as much loose ink as possible before introducing a cleaner.
Move to a clean section of the cloth each time ink transfers.
This simple step can prevent a small pen mark from becoming a larger smear.
Step 2: Patch-Test Before Using Any Cleaner
Never assume a product is safe just because it is marketed as a leather cleaner.
Apply a tiny amount to a hidden area of the same shoe, such as an inconspicuous section of the tongue or another concealed part of the upper.
Allow the test area to dry and check for:
- Color transfer
- Fading
- Darkening
- Stickiness
- Dulling
- Peeling
- Texture changes
- Excessive absorption
If you see an unwanted reaction, stop.
The purpose of a patch test is not simply to determine whether the cleaner removes ink. It is to determine whether the cleaner also removes or alters the leather’s finish.
Current leather-care guidance strongly emphasizes patch testing because different finishes and dyes can react differently to the same cleaning product.
How to Remove Ink Stains from Leather Shoes
Method 1: Start with a Leather-Safe Cleaner
For a finished leather shoe, this should be your controlled starting point.
How to do it
- Apply a small amount of leather-safe cleaner to a cotton swab or soft white cloth.
- Do not pour the product directly onto the shoe.
- Dab the ink mark gently.
- Work on a small section at a time.
- Move to a clean part of the swab or cloth as ink transfers.
- Keep the surrounding leather as dry as reasonably possible.
- Remove cleaner residue according to the product instructions.
- Allow the shoe to air-dry naturally.
- Inspect the area before deciding whether another treatment is necessary.
Do not increase pressure simply because the first pass did not remove everything.
Several controlled passes are preferable to aggressively scrubbing the leather.
Leather-care specialists recommend this gradual approach because excessive cleaner, pressure or moisture can spread the stain and affect the finish.
Method 2: Use Isopropyl Alcohol Carefully for Stubborn Ink
Rubbing alcohol can help loosen some ink stains on compatible finished leather, but it should not be treated as a universal leather cleaner.
If you decide to use it:
- Confirm that the leather is suitable for the treatment.
- Patch-test first.
- Use a cotton swab rather than pouring alcohol onto the shoe.
- Moisten the swab lightly.
- Dab the ink rather than scrubbing it.
- Work within the stained area.
- Replace the swab when ink transfers onto it.
- Stop immediately if the leather’s color or finish begins transferring.
- Allow the area to dry naturally.
- Condition the leather afterward if the material’s care instructions call for conditioning.
The important distinction is that rubbing alcohol is an option, not a guarantee.
Some leather finishes tolerate it better than others. A cleaner that successfully removes ink can also affect dye or finish, which is why patch testing matters.
Pecard, Fibrenew and other leather-care specialists similarly recommend controlled rubbing-alcohol use, careful testing and conditioning where appropriate.
Method 3: Mild Soap for Very Fresh Surface Marks
If the ink is extremely fresh and appears to be sitting mostly on the surface, a mild cleaning solution may be enough.
Use:
- A small amount of mild soap
- A small amount of water
- A clean microfiber cloth
Mix a very mild solution.
Dampen the cloth rather than soaking it.
Gently dab the affected area.
Then remove residue with a clean cloth according to the leather manufacturer’s instructions.
This method is gentler than jumping straight to a solvent, although it may not remove a set-in ballpoint or permanent-marker stain.
How to Remove Ballpoint Pen Ink from Leather Shoes
Ballpoint pen marks are one of the most common reasons people search for how to remove pen ink from leather shoes.
For finished leather, use this sequence:
- Blot fresh ink.
- Patch-test a leather-safe cleaner.
- Dab the mark with a small amount of cleaner.
- Change cotton swabs as ink transfers.
- Allow the area to dry.
- Reassess.
- If the stain remains and the leather is compatible, use a carefully controlled solvent treatment.
- Stop if the original leather color begins transferring.
Do not chase the final trace of ink by increasing pressure.
A slightly visible mark can be less noticeable than a large area where the finish has been removed.
How to Remove Dried Ink from Leather Shoes
Dried ink requires more patience.
Start by gently removing any surface residue that can be lifted without scraping the leather.
Then:
- Patch-test a compatible leather cleaner.
- Apply a small amount to a cotton swab.
- Dab the dried stain.
- Let the cleaner work according to its instructions.
- Wipe away lifted ink.
- Allow the leather to dry.
- Inspect the finish.
- Repeat only if the leather remains unchanged and the product instructions allow it.
If nothing is improving after careful attempts, stop.
A deeply absorbed stain may require professional cleaning or color restoration rather than more solvent.
How to Remove Ink from White Leather Shoes
White leather requires extra caution because removing the ink is only half the problem.
You also need to avoid creating a visible faded or darker patch.
Follow this process
- Blot fresh ink with a clean white cloth.
- Patch-test the chosen cleaner.
- Use a cotton swab for precise application.
- Dab rather than scrub.
- Change the swab frequently.
- Watch closely for color loss.
- Remove residue carefully.
- Allow the leather to dry naturally.
- Once completely dry, inspect the treated area.
- If the ink has been removed but the finish has lost color, use a compatible white leather cream or professional color restoration product as appropriate.
Do not use bleach simply because the leather is white.
Do not use abrasive household cleaners to compensate for a stubborn stain.
The objective is to preserve both the color and finish of the shoe.
How to Remove Pen Marks from Leather Sneakers
The same basic method works for many smooth leather sneakers:
Blot → identify → patch-test → dab → wipe → dry → condition if appropriate.
Remove laces if they interfere with the stained area.
Keep cleaning products away from mesh panels, fabric sections, suede overlays and decorative materials unless the product is approved for those materials.
Many modern sneakers combine several materials, so treating the entire shoe as leather can create a second problem.
What About Suede and Nubuck Shoes?
Do not use the smooth-leather alcohol procedure on suede or nubuck simply because the stain is ink.
These materials have a raised nap and respond differently to moisture and friction.
For suede:
- Let the shoe dry if it is wet.
- Brush away loose dirt.
- Use a suede eraser for suitable surface marks.
- Use a suede-specific cleaner for stains that require liquid treatment.
- Allow the shoe to dry naturally.
- Brush the nap back into place.
For a more detailed process, see our guide on how to clean suede shoes without water.
Nike’s footwear-care guidance also recommends material-specific suede tools and cautions against treating suede like ordinary washable fabric.
Can You Use Nail Polish Remover or Acetone on Leather Shoes?
Do not use acetone or nail-polish remover as a default ink-removal method on leather shoes.
These products can affect leather finishes, dyes and coatings.
The fact that a solvent removes ink does not mean it is safe for the shoe.
If a stain cannot be removed using a compatible leather-care product, professional treatment is usually a better choice than escalating to stronger household solvents.
Can You Use Hairspray to Remove Ink from Leather?
Hairspray is an old household ink-removal suggestion, but it is not a reliable default for leather shoes.
Modern formulations can contain ingredients that leave residue or interact unpredictably with the leather finish.
A purpose-designed leather cleaner or ink remover gives you better control over the treatment.
Can You Use a Magic Eraser on Leather Shoes?
Be careful.
Melamine foam works through abrasive action. It may remove a mark, but it can also dull or abrade a leather finish.
If you use an abrasive product on the shoe, you may remove part of the surface coating along with the ink.
For leather, controlled chemical cleaning is generally preferable to aggressive mechanical abrasion.
Magic erasers are more appropriate for certain hard rubber outsole areas than for delicate leather uppers.
Can You Use Toothpaste to Remove Ink from Leather?
It is better to avoid toothpaste on leather.
Toothpaste is formulated for teeth, not leather finishes, and some formulas contain abrasive particles.
If the goal is ink removal, use a cleaner designed for leather rather than relying on an abrasive household product.
What About Hand Sanitizer?
Some hand sanitizers contain alcohol, which explains why they sometimes appear in DIY ink-removal advice.
However, hand sanitizer is not formulated specifically for leather.
It may also contain humectants, fragrances or other ingredients that leave residue.
If you need an alcohol-based treatment, controlled use of a suitable product after a patch test is a more predictable approach.
How to Clean Ink from the Inside of a Leather Shoe
The lining of a shoe may be made from leather, synthetic material, textile or a combination of materials.
Do not assume the outer-upper cleaning method is suitable for the lining.
First identify the lining material.
Then:
- Remove loose ink by blotting.
- Check the shoe’s care instructions.
- Patch-test the selected cleaner.
- Use the smallest practical amount.
- Avoid soaking the lining.
- Allow the shoe to dry completely before wearing it.
If the lining is heavily stained or the material is unknown, professional cleaning is safer than aggressive solvent use.
What Should You Do If the Ink Stain Is Still Visible?
This is where many cleaning attempts go wrong.
People see a small remaining mark and increase the amount of alcohol, scrub harder or introduce another chemical.
Do not do that.
Stop and inspect the leather.
Ask:
- Is the ink actually getting lighter?
- Is the leather changing color?
- Is the finish becoming dull?
- Is the surface becoming sticky?
- Is the leather becoming rough?
- Is dye transferring onto the swab?
- Is the treated area becoming larger than the original stain?
If the leather is changing but the ink is not improving, stop cleaning.
At that point, professional color correction or refinishing may produce a better result than additional stain removal.
How to Restore Leather After Removing Ink
Once the ink has been removed, do not immediately apply several different products.
First let the leather dry naturally.
Then inspect it.
If the leather is compatible with conditioning, apply a small amount of a conditioner designed for that specific leather.
Aftercare process
- Make sure the surface is completely dry.
- Patch-test the conditioner if it is a new product.
- Apply a small amount to a clean cloth.
- Spread it evenly over the affected area as directed.
- Avoid excessive product.
- Allow it to absorb according to the product instructions.
- Buff away excess if required.
Conditioning is not a way to hide an ink stain. Its purpose is to maintain the leather after cleaning when conditioning is appropriate for that material.
Leather-care specialists recommend compatible conditioning after stain treatment, while also cautioning against over-application.
For broader maintenance, see our complete shoe care guide.
When Should You Stop DIY Cleaning?
Professional help is the better option when:
- The leather is aniline or unfinished.
- The leather is suede or nubuck.
- The shoe is antique or highly valuable.
- The ink covers a large area.
- The stain has penetrated deeply.
- The leather is already cracked.
- The finish is peeling.
- The color begins transferring.
- The surface becomes sticky or dull.
- Several careful treatments have produced little improvement.
- You are unsure what type of leather you have.
The goal is not necessarily to achieve laboratory-perfect stain removal.
The goal is to restore the shoe without creating a more difficult repair.
Ink Removal Methods Compared
| Method | Best Use | Effectiveness | Risk to Leather | Recommendation |
| Blotting | Fresh wet ink | Low to high | Very low | Start here |
| Leather-safe cleaner | Finished leather | Medium to high | Low to moderate | Best general option |
| Isopropyl alcohol | Stubborn ink on compatible finished leather | High in some cases | Moderate | Use cautiously |
| Mild soap solution | Fresh surface marks | Low to medium | Low | Good gentle option |
| Dedicated leather ink remover | Stubborn or older stains | Medium to high | Product-dependent | Good option after testing |
| Hairspray | DIY emergency remedy | Unpredictable | Moderate | Avoid as default |
| Magic eraser | Hard rubber components | High on suitable surfaces | High on leather finish | Do not use aggressively on leather |
| Acetone | Solvent cleaning | High | High | Avoid |
| Bleach | White-material cleaning | Unreliable | Very high | Do not use on leather |
| Professional treatment | Delicate/deep/valuable stains | High potential | Lowest when properly handled | Best for difficult cases |
Fresh Ink vs. Dried Ink: What Changes?
| Stain Condition | Recommended Approach |
| Fresh ink | Blot immediately and contain the stain |
| Recently dried ink | Patch-test and use controlled spot cleaning |
| Old dried ink | Use gradual treatment and reassess after drying |
| Deeply absorbed ink | Consider professional treatment |
| Ink plus color loss | Treat the color problem separately |
| Ink on delicate leather | Avoid aggressive DIY solvent treatment |
Fresh ink is generally easier to control because there is less opportunity for it to spread across or penetrate the surface. Once a stain has dried or penetrated the leather, complete removal may become more difficult.
Common Mistakes That Make Ink Stains Worse
1. Scrubbing the Stain
Scrubbing can spread ink and damage the finish.
Better: Dab and lift.
2. Pouring Cleaner Directly onto the Shoe
This creates unnecessary moisture and makes it harder to control where the product goes.
Better: Apply a small amount to a cotton swab or cloth.
3. Skipping the Patch Test
A cleaner can be suitable for one leather finish and unsuitable for another.
Better: Test first.
4. Using Multiple Chemicals at Once
Combining products makes it difficult to determine which one caused a reaction.
Better: Use one controlled method at a time.
5. Using Strong Solvents Too Quickly
Stronger does not automatically mean better.
Better: Start with the mildest compatible method.
6. Using Heat to Speed Up Drying
Hair dryers and direct heat can create unnecessary stress on leather and finishes.
Better: Air-dry naturally.
7. Continuing After the Leather Starts Changing
If the leather’s color, texture or finish changes, continuing the treatment can make the damage worse.
Better: Stop and reassess.
A Simple Ink-Stain Rescue Checklist
Before you start, ask yourself:
☐ Is the ink fresh?
If yes, blot first.
☐ Is the shoe definitely smooth finished leather?
If no, identify the material before using a solvent.
☐ Have I checked the manufacturer’s care instructions?
If available, follow them.
☐ Have I patch-tested the cleaner?
Never skip this step.
☐ Am I using a small amount of product?
More cleaner is not necessarily better.
☐ Am I dabbing instead of scrubbing?
Keep the treatment controlled.
☐ Is the leather changing color or texture?
If yes, stop.
☐ Has the leather dried completely?
Inspect before repeating treatment.
☐ Does the leather need conditioning?
Use only a compatible conditioner.
How to Prevent Future Ink Stains on Leather Shoes
Prevention is easier than stain removal.
If you regularly carry pens around your footwear, bags or other leather goods:
- Keep pens capped.
- Store pens in a separate pouch.
- Do not place loose pens inside shoe bags.
- Check pens for leaks before travel.
- Keep markers away from leather surfaces.
- Clean small marks before they become established.
- Maintain the leather according to its care instructions.
For general footwear maintenance, our complete shoe care guide covers cleaning, conditioning, protection and storage across different shoe materials.
Final Verdict: What Is the Best Way to Remove Ink from Leather Shoes?
The safest approach is not to reach for the strongest chemical first.
Start by identifying the leather, blotting fresh ink, patch-testing a compatible leather cleaner and treating the mark gradually.
For stubborn ink on compatible finished leather, a carefully controlled application of rubbing alcohol may help. But it should never be treated as a universal solution, and it should never be applied without a patch test.
Avoid acetone, bleach, aggressive scrubbing and unnecessary heat.
If the leather is delicate, valuable, deeply stained or begins reacting during treatment, stop and seek professional help.
The best result is not simply removing the ink.
It is removing as much of the stain as safely possible while preserving the leather underneath.
Frequently Asked Questions
Can you remove ink stains from leather shoes?
Yes, many ink marks can be reduced or removed from finished leather, especially when treated carefully and promptly. The result depends on the leather finish, ink type, stain age and cleaning method.
What is the best way to remove pen ink from leather shoes?
Start by blotting fresh ink, then patch-test a leather-safe cleaner and dab the stain carefully. For stubborn marks on compatible finished leather, controlled use of isopropyl alcohol may help.
Can rubbing alcohol damage leather shoes?
Yes. Rubbing alcohol can affect some leather dyes and finishes. Always patch-test first and stop if the leather changes color, texture or finish.
Can I use 70% isopropyl alcohol on leather shoes?
It can be appropriate for some finished leather surfaces, but it is not universally safe. Test a hidden area first and use only a small amount on the stain.
How do I get dried ink out of leather shoes?
Patch-test a leather-safe cleaner, apply a small amount to the stain and dab gradually. Allow the leather to dry between attempts. If the stain is deeply absorbed or the finish begins changing, stop and consider professional treatment.
How do I remove ballpoint pen ink from leather?
Blot fresh ink first. Then use a compatible leather cleaner with a cotton swab or soft cloth. For stubborn marks, a carefully tested solvent treatment may be appropriate for some finished leather.
How do I remove ink from white leather shoes?
Use a controlled, patch-tested leather-safe cleaner and watch carefully for color loss. Avoid bleach and abrasive household cleaners. If the ink removal exposes or changes the underlying color, a compatible white leather cream or professional color restoration may be needed.
Can I use acetone or nail polish remover on leather?
It is not recommended as a default cleaning method. Acetone and other strong solvents can damage finishes and dyes.
Can I use toothpaste to remove ink from leather?
No. Toothpaste is not designed for leather and may contain abrasive ingredients that can dull or damage the finish.
Can a Magic Eraser remove ink from leather?
It may remove surface marks through abrasion, but that abrasion can also damage or dull the leather finish. Avoid aggressive use on leather uppers.
Can I use hairspray to remove ink from leather?
It is better not to rely on hairspray. Formulations vary and can leave residue or affect the finish. A leather-specific cleaner is a more controlled option.
How do I remove ink from suede shoes?
Do not automatically use the smooth-leather method. Suede requires material-specific care. Start with dry brushing and a suede eraser where appropriate, followed by a suede-specific cleaner for stains that require moisture.
For more information, see our suede shoe cleaning guide.
Should I condition leather after removing ink?
If the leather is suitable for conditioning and the cleaning process has left it dry, apply a compatible leather conditioner after the surface has completely dried. Follow the conditioner’s instructions and avoid over-applying it.
When should I take ink-stained shoes to a professional?
Seek professional help for aniline or unfinished leather, suede or nubuck, large or deeply absorbed stains, valuable footwear, damaged finishes, or any situation where the leather begins changing during DIY treatment.
About Urban Style Footwear
At Urban Style Footwear, our footwear advice is informed by years of hands-on experience with shoes, materials, fit and everyday footwear care.
We focus on practical guidance that helps readers understand not only how to solve a shoe problem, but also how to avoid making that problem worse.
For broader maintenance advice, explore our complete shoe care guide.